Arduino Basics Part 2
This is the 3rd post of Arduino tutorial. In this post, we are going to talk about Arduino basics. These basics are little bit advanced. But not hard. Let’s get started.
This is ‘Edit’ menu in Arduino IDE. Edit menu is used for editing code and text. ‘Undo’, ’Redo’, ‘Copy’, ‘Paste’ are the most common editing tools in every Editor. ‘Copy for Forum’ is for copying the whole code. ‘Copy as HTML’ is use for copying whole files as HTML friendly file. You can select whole code using ‘Select All’ option. ‘Go to Line’ is for go to code line. ‘Comment/Uncomment’ is for commenting uncommenting a line. Comment means that line is not uploaded to Arduino board. But you can see it in sketch. ‘Find’ option set gives you an ability to find some specific text in the code and replace it.
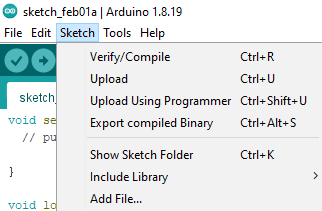
This is ‘Sketch’ tab of Arduino IDE menu bar. ‘Verify and Compile’ is for verifying the sketch.
‘Upload’ is for uploading code to Arduino board. ‘Upload using programmer’ is
bit complex one. It’s used for uploading codes to ICs using Arduino board. ‘Export
Compiled Binary’ is for export the code as a binary file. You don’t need to use
that option. ‘Import library’ means importing Arduino based library(sketchbook)
to Arduino. It will make your program shorter and easier. In the ‘Add file’
section you can add INO (Arduino Project) file to your code.
Here is the ‘Tools’ tab in Arduino. This is the most interesting tab in Arduino IDE. By clicking ‘Autoformat’ tab, you can align your code. It will make the code easier to read. ‘Archive Sketch’ make the code as an Archive. ‘Manage Libraries’ will give ability to you to include libraries or remove libraries. ‘Serial Monitor’ and ’Serial Plotter’ will show you the Arduino outputs as digital values. Serial monitor is the common output type. In the ‘Board’ tab, you can choose your Arduino board. It much be chosen before uploading the sketch. ‘Get board information’ will get your Arduino board info like What type. ‘Programmer’ tab is also like ‘Upload as Programmer’ tab in ‘Sketch’. But not same. ‘Programmer’ tab for choose your IC type. ‘Burn Bootloader’ is also in the Arduino IC (Atmega, Attinty) programming.
So, this is a long topic, you can learn other part in our 4th Arduino tutorial post.


